
If you are new to Git and Github, and even if you are not from any technical background, this article will clear all your myths related to it.
 Photo by Yancy Min on Unsplash
Firstly let’s begin with some of the jargons try to understand them in easy words -
Git :
Git is just a software which tracks the changes in the files of your project.
It keeps the different versions of your files, hence it belongs to a category of software called Version Control System (VCS) so that different Versions of Software is in your Control
So if you are a developer, it can help you in handling situations like:
- Reverting back to an older version of your code
- Collaborate with the team effectively while working on the same project.
Repository :
The sole purpose of git is to track the changes in the project and collection of files and keep different versions of it.
So, the question is where does the git store these changes made in your project files. Here comes the concept of a repository, it is just a sub-directory in the root directory of your project you are working upon, which stores all the information related to changes in your files and much more useful information like who made the changes and when these were made.
Remote :
Suppose a situation where you are working on a team project consisting of different members. So the situation can’t be handled easily. A great hard-work will be required to merge the changes made by all into a single final project. And there can also be situations like there will be merge conflicts due to differences in a file which are stored on a single member’s machine. So we can say in this way, we can’t really collaborate on a team project.
Git solves this problem through ‘remote’.A git remote is a common repository residing on another central machine, which can be used by the whole team for collaboration on a team project.
Till now you know what is git, a repository and a remote. Another thing which we are going to discuss is “Github”.First of all, there is always confusion between Git and Github. Are they same thing or different?. So for more clarification-
— Git is a version control system, a tool to manage versions of your code
— GitHub is a hosting service for git repositories.
Now another question which can come into your mind is “How Git is gonna track and stage all the changes?”.The answer lies behind the distinct Git States, let’s tackle them first before proceeding-
Git States
The basic workflow of git includes the following three stages :
->Modified
It is the state when you make changes in a file, but it is untracked by the git.
->Staging
When you have modified a file or files, then you have to inform the git to look over and track the file if it is untracked till now, by taking a snapshot and this snapshot will go into the next commit.So we can say it is just the marking of a file to go into the next commit.
->Committed
It is the state when all the staged changes are stored in the local git repository or we can say the database.
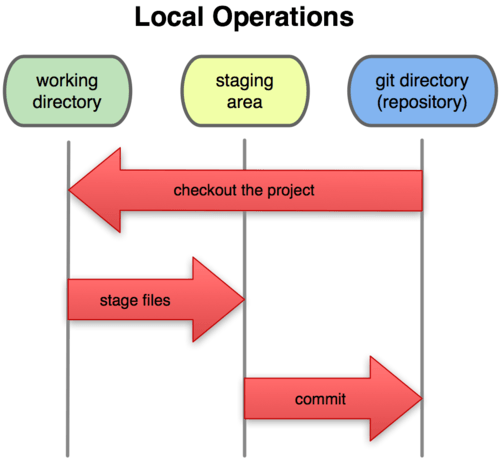
https://git-scm.com/book/en/v1/Getting-Started-Git-Basics
After this much, we can continue creating a git repository on your local machine and then pointing it to Github. All you need is git installed on your system and a GitHub account.
We will be using Ubuntu for the tutorial but most of the commands are same for Windows also. Let’s Go!!
Step 1: Configuring Git
git –version
*To check the version of git and for making sure git is installed or not.
git config –global user.name “github username”
git config — global user.email “github email”
*Replace username and email with your GitHub username and email.
Step 2: Initialising a git repository
git init
Fire this command in your project directory and this will initialize a git repository and you will see a .git folder in your project directory.
Step 3: Connecting to a repository
a)Create a repository on GitHub for your project

b)Add a Remote

git remote add origin url
Replace url with the https link of your repository.
*In the above command origin is just a remote name, you can also use other names for your remote.
Hola!!All set up.
In case you want to use an existing project hosted on GitHub skip all the above steps and clone the GitHub repository in your preferred directory.
git clone url
Let’s move on to 4 more essential git commands-
git add filename
This command will add the file into the staging area.
*Replace filename with the name of the file you want to add into the staging area.
*To add all the files of the directory replace filename with .[dot]
git commit -m “commit_message”
This will commit all the changes which are currently in the staging area. So this command is a bridge between the staging area and committed area.
git push origin master
This command will push all the files of the local repository of the ‘master’ branch to the Github/Central repository with remote name ‘origin’.
*Ignore the word branch here. We will take a look at it later. So just use master in the above command.
git pull origin master
This will pull all the contents of the master branch stored on GitHub/Central Repository to your local repository.
Other useful commands-
git status
This shows the state of your working directory and helps you see all the files which are untracked by Git, staged or unstaged.
git log
It is used to check the history of commits.
Thanks for Reading Mate!!
This blog was focused mainly on basics of Git And GitHub.All the concepts like branching, merging, resolving merge conflicts will be covered in detail in Part-2.
Happy Learning!!